Search This Blog

Sunday, July 7, 2013

Envelope Pillows

I bought some fun fabric to make pillows for my new couches. I wanted to do something easy yet classy. I used this tutorial to create these beauts: http://www.youtube.com/watch?v=4LJnPEvjdDo


I bought a yard of each of these fabrics and six pillow forms.


After some serious ironing, the envelope pieces were created. My pillow forms are 16x16, so I used the following measurements for the pillows. Dimensions for other sized pillow can be found on the youtube tutorial.

Pillow form 16x16
(1) 17x17
(1) 17x12
(1)17x13


The finished product:


Tuesday, August 14, 2012

Casserole Carrier

Found a great gift idea from The Two Little Hooligans via Pinterest. I have pumped out 5 of these out of my sweatshop. They're really fun for wedding gifts. 


Their tutorial provides the dimensions and instructions on how to make the Casserole Carrier. I substituted belting in for their homemade handles.  I also added a spoon holder. This is 3 inches x 2 inches (ish).


To add to the gift, I etched the couples last name to a 9x13 dish. The names were created with Cricut machine and vinyl. The height of the text is 1 1/4". The vinyl is a sticker and applies easily to the dish. We used a sponge brush to apply the Armour Etch and let it sit for about a minute. Washed it off in the sink and then were left with an awesome finished product.


My Aunt Marlae made me a cupcake oven mitt for my bridal shower. I used it as a pattern outline. It should be just shy of a full 81/2x 11 piece of paper. I sewed the top part of the mitt through to the two line marks.

Cupcake Mitt Instructions:

  • Cut out two pieces of fabric and one piece of insul-bright the size of the pattern below.
  • Sew the three pieces together leaving a gap to turn inside out.
  • Top stitch the 'wrapper' section of the mitt. 
  • Top stitch vertical lines on the mitt to create the wrapper effect. 
  • Cut out two pieces of the top fabric and one piece of insul-bright. The swoops will extend a bit farther than what needs to be sewn to the 'wrapper' part of the cupcake.
  • Top stitch the 'frosting'.
  • Cut out a piece of fabric for the hook. Fold over and iron.
  • Sew 'frosting' and hook to the cupcake 'wrapper'.

Click to make larger. Remove margins when printing.


Here is another example of the finished product:


Saturday, June 23, 2012

Birdbath Revival

Every Saturday my husband and I go garage-saling. It's an exhilarating hunt for new treasures and good deals. Today we found this broken down birdbath that was looking for a good home and heck, the price was right. The dude threw this 'junk' in with some sprinklers we bought.


 The birdbath surface was super uneven and some spots had holes. Originally I thought I could repair what was there, but that was a lost cause.  So, I started out by whacking out the guts. I left the lip intact so me future feathered friends would have a ledge to stand on.


I evened out the pedestal's lip by taking a sawzall to it. Be afraid. 

I just happened to have some concrete glue leftover from another project. This stuff is awesome!


The 'before' shot


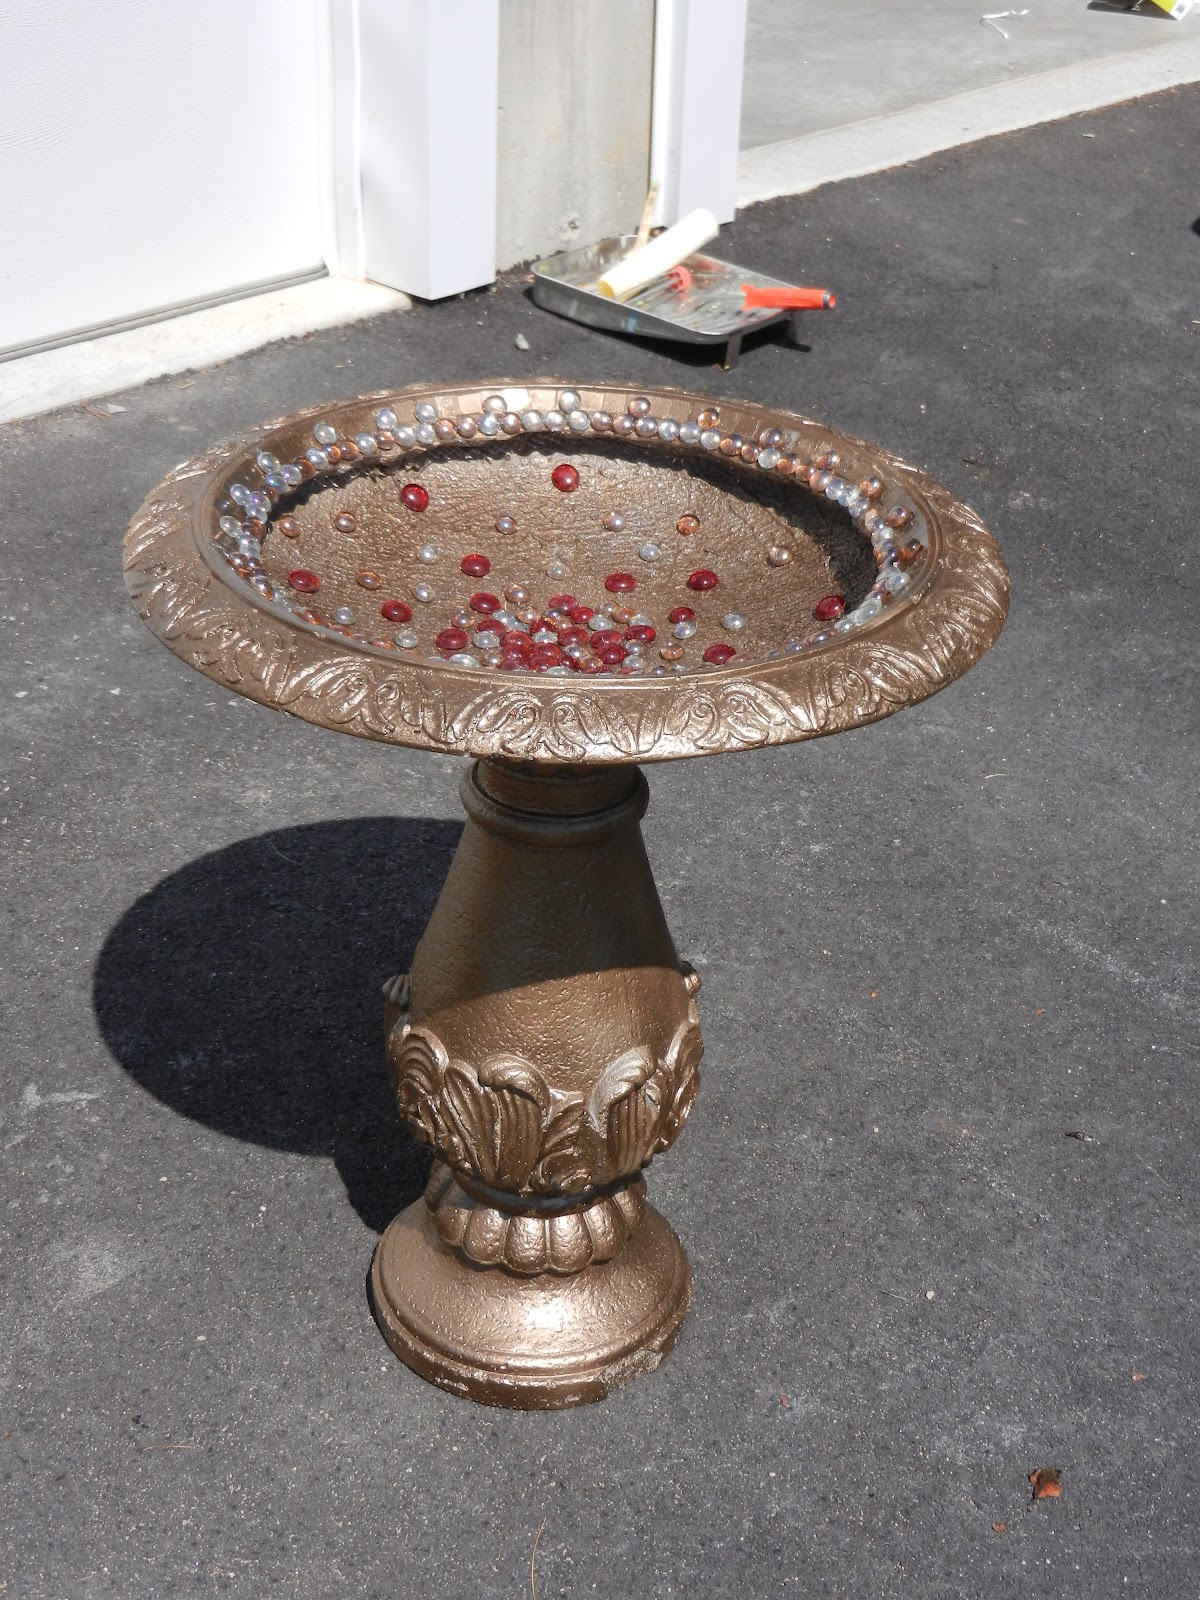
After - with a new coat of paint!


I found some glass beads hanging out in my garage. I added these to the rim of the bird bath and in the middle with a hot glue gun. After that, I applied a sealant spray paint.

Now let's hope the birds come out and play!


Tuesday, May 22, 2012

Revamping Flower Pots

Found some flower pots at a garage sale for a BUCK each. We were looking into buying pots new; they cost an arm and a leg, so this was a steal of a deal. They were looking a little sad, so I decided spruce them up with a coat of paint.


Using a gloss spray paint makes the pots look like their ceramic. This a cheap way to get this rich look. 
Here's the finished product. They'll eventually hang out on our patio... once we're done making the patio...


Saturday, May 12, 2012

Home Made Piñatas

For Cinco de Mayo I wanted to make some piñatas for my fiesta.

First I blew up a balloon and shredded some newspaper:


I applied the strips of paper using a flour and water combo. (One part water, one part flour: boiled and cooled. Makes for a strong paste!)


After letting the strips harden over night, I applied another layer of newspaper.


I felt that the newspaper wasn't as strong as I would like it to be, so my next layer was with a thick cardboard/ cardstock material. I also applied it to the balloon form with the flour paste.
 Once that was thoroughly dried, I began applying the decorative shell. I took several layers of tissue paper and cut squares. I applied the tissue to the balloon with a glue stick.


When I was close to completing covering the balloon, I cut a hole to insert the goodies.The balloon popped inside and shriveled up. Upon removing the balloon, I inserted the candies. Once completed, I used duct tape to seal up the hole and finished gluing the tissue paper on it.

The the finished piñatas:


Monday, January 23, 2012

Fan Scarf

I originally saw this scarf on Pinterest from One Flew Over.

It's a super easy pattern that can be found at this link.

Sunday, January 8, 2012

Valentine Poof Balls

 Getting ready for V-Day


Supplies:
6 Styrofoam balls
Crepe Paper
Muslin fabric
Plastic tablecloth
Hot glue gun

 I folded over the top and started twisting the streamers until it formed a flower.


After I formed a few, I started gluing them to the ball.


I cut out white ovals then folded them hot dog style, then again hamburger style. These were each glued to the ball. No real strategy here.

The last two balls are made out of a random tablecloth I bought at a g'sale. I cut off about 2 inches off of one end off the folded tablecloth and glued them to the balls. 

Here are the completed balls!